# Webpack 使用总结
# 前端的发展
近年来 Web 应用变得更加复杂与庞大, Web 前端技术的应用范围也更加广泛。通过直接编写 JavaScript、css、 HTML 开发 Web 应用的方式己经无法应对当前 Web 应用的发展 。 近年来,前端社区涌现出 许 多新思想与框架,下面将一一介绍它 们 。
# 模块化
模块化是指将一个复杂的系统分解为多个模块,方便编码
很久以前,开发网页要通过命名空间的方式来组织代码,例如 jQuery 库将它的 API 都放 在了 window .$下,在加载完 jQue 町后,其他模块再通过 window . ♀ 去使用 jQuery。这样做 有很多问题,其中包括:
命名空间冲突,两个库可能会使用同一个名称,例如 Zepto (http://zeptojs.com)也 被放在 w 工 ndow.$下
无法合理地管理项目的依赖和版本
无法方便地控制依赖的加载顺序。
直白一些就是开发效率会低,维护成本会大。
# CommonJS
CommonJS 是一种广泛应用的 Javascript 模块化规范,核心:
require 方法同步加载依赖的其他模块,
module.exports 导出需要的接口
CommonJS 的流行 的益于 node 采用该方式,后来这种方式被引入到网页中开发
采用 CommonJS 导入及导出的代码如下:
// 导入
const moduleA = require ( ’. / moduleA ’); // 导出
module .exports = moduleA.someFunc;
2
3
CommonJS 的优点在于:
1.代码可复用于 Node.js 环境中,例如做同构
2.通过 npm 发布的很多第三方模块都采用了,CommonJS 规范。
缺点:
1.不能直接在浏览器环境中运行,必须通过工具转换为 ES5 的标准
历史
CommonJS 还可以细分为 CommonJSl 和 CommonJS2
CommonJS1 和 CommonJS2 区别:
CommonJS1 只能通过 exports . XX = XX 导出
CommonJS2 在 CommonJSl 的基础上加入了 module. exports = XX
# AMD
AMD 也是一种 JavaScript 模块化规范。
AMD 与 CommonJS 区别:AMD 采用了异步的方式去加载依赖的模块。
AMD 主要用于解决针对浏览器环境的模块化问题,最具代表性的实现是 requirejs。
采用 AMD 导入及导出的代码如下:
采用 AMD 导入及导出的代码如下:
// 定义一个模块
define (’ module ’ , [ ’ dep ’] , function (dep) {
requirejs
(http://
return exports;
});
//导入和使用
require ([’module’] , });
2
3
4
5
6
7
8
9
AMD 的优点在于:
1.可在不转换代码的情况下直接在浏览器环境中运行
2.异步加载依赖
3.可以并行加载多个依赖
4.代码可以在浏览器环境中与 Node 环境中运行
AMD 的优点在于:
JavaScript 运行环境没有原生支持 AMD。, 需要先导入实现了 AMD 的库 后才能正常使用。
# ES6 模块化
ES6 模块化是国际标准化组织 ECMA 提出的 JavaScript 模块化规范,它在 语言层面上实 现了模块化。浏览器厂商和 Node. 都宣布要原生支持该规范 。 它将逐渐取代 CommonJS 和 AMD 规范,成为浏览器和服务器通用的模块解决方案 。
采用 ES6 模块化导入及导出的代码如下:
//导 入
import { readFile } from ’ fs ’; import React from ’react’; //导出
export function hello {) {};

export default {

...
}
2
3
4
5
6
7
8
# 常见的构建工具及对比
# Gulp
Gulp 是基于流的自动化构建工具。可以管理和执行任务。还可以支持监听文件,与读写文件
Gulp 被设计得非常简单,只通过下面 5 种方法就可以支持几乎 所有构建场景:
gulp.task 注册任务
gulp.run 执行任务
gulp.watch 监听任务
gulp.src 读取文件
gulp.dest 写文件
举个例子 Gulp 和 Rollup 实现了对数据的流清洗
const gulp = require('gulp');
const watch = require('gulp-watch');
const rollup = require('gulp-rollup');
const babel = require('gulp-babel');
const replace = require('rollup-plugin-replace')
const entry = './src/server/**/*.js';
const clearEntry = ["./src/server/config/index.js"]


function buildenv() {
    return watch(entry, { ignoreInitial: false }, function() {
            gulp.src(entry)
                .pipe(babel({
                    //非常重要一点,涉及到自己独立的编译,外面的留给前端
                    babelrc: false,
                    "plugins": [
                        ["@babel/plugin-proposal-decorators", { "legacy": true }],
                        "@babel/plugin-transform-modules-commonjs"
                    ]
                })).pipe(gulp.dest('dist'))
        })
        // .pipe(gulp.dest('dist')); 放外面监测不到,有点毛病 😔

}
//与开发没有多大区别,只不过要加一个流式清洗
function buildprod() {

    return gulp.src(entry)
        .pipe(babel({
            //非常重要一点,涉及到自己独立的编译,外面的留给前端
            babelrc: false,
            ignore: clearEntry,
            "plugins": [
                ["@babel/plugin-proposal-decorators", { "legacy": true }],
                "@babel/plugin-transform-modules-commonjs"
            ]
        })).pipe(gulp.dest('dist'))
}

function buildconfig() {
    return gulp.src(entry)
        .pipe(rollup({
            //注意一点要编译成commonjs
            output: {
                format: "cjs"
            },
            input: clearEntry,
            //由于打包后,对process.env.NODE_ENV没有处理
            plugins: [
                replace({
                    "process.env.NODE_ENV": JSON.stringify('production')
                })
            ]
        }))
        .pipe(gulp.dest('./dist'));
}

function lint() {

}
let build = gulp.series(buildenv)

if (process.env.NODE_ENV == 'lint') {
    build = gulp.series(lint)
}
if (process.env.NODE_ENV == 'production') {
    build = gulp.series(buildprod, buildconfig)
}
gulp.task("default", build)
2
3
4
5
6
7
8
9
10
11
12
13
14
15
16
17
18
19
20
21
22
23
24
25
26
27
28
29
30
31
32
33
34
35
36
37
38
39
40
41
42
43
44
45
46
47
48
49
50
51
52
53
54
55
56
57
58
59
60
61
62
63
64
65
66
67
68
69
# Webpack
Webpack 是一个打包模块化 js 的工具 🔧,在 Webpack 中一切皆模块,通过 loader 转化文件,通过 Plugin 注入钩子,最后输出由多个模块组合成的文件 📃。
一切文件如 JavaScript、 css、 scss、图片、模板,对于 Webpack 来说都是一个个模块
# Rollup
Rollup (https://rollupjs.org)是一个和 Webpack 很类似但专注于 ES6 的模块打包工具。它 的亮点 在于,能针对 ES6 源码进行 Tree Shaking,以去除那些己被定义但没被使用的代码 并进 行 Scope Hoisting,以减小输出 文件的大 小和提升运行性能 。然而 Rollup 的这些亮点随后就被 Webpack 模仿和实现。由于 Rollup 的使用方法和 Webpack 差不多 ,所以这里就不详细介绍如 何使用 Rollup 了,而是详细说明它们的差别:
• Rollup 是在 Webpack 流行后出 现的替代品
• Rollup 生态链还不完善,体验不 如 Webpack • Rollup 的功能不如 Webpack 完善 ,但其配置和使用更简单
• Rollup 不支持 CodeSpliting,但好处是在打包出来的代码中没有 Webpack 那段模块 的加载、执行和缓存的代码
# 整体流程分析
# 第一步,执行 webpack 函数,在 webpack 函数中初始化 compiler 对象 new Compiler(options.context),初始化自定义插件 plugin.apply(compiler)
const webpack = (options, callback) => {
	let compiler;
	if (typeof options === "object") {
		options = new WebpackOptionsDefaulter().process(options);
		//创建编译对象
		compiler = new Compiler(options.context);
		compiler.options = options;


		//将Node.js格式的文件系统应用于compiler。
		new NodeEnvironmentPlugin({
			infrastructureLogging: options.infrastructureLogging
		}).apply(compiler);
		if (options.plugins && Array.isArray(options.plugins)) {
			for (const plugin of options.plugins) {
			// 执行自定义插件
				if (typeof plugin === "function") {
					plugin.call(compiler, compiler);
				} else {

					plugin.apply(compiler);
				}
			}
		}
		//触发environment钩子函数:在准备环境之前运行插件。
		compiler.hooks.environment.call();
		// 触发afterEnvironment钩子函数:执行插件环境设置完成。
		compiler.hooks.afterEnvironment.call();
		//处理配置中的target参数,例如 web,node,根据不同配置,配置默认的plugin。
		compiler.options = new WebpackOptionsApply().process(options, compiler);
	}
	if (callback) {
	 // 开始编译
		compiler.run(callback);
	}
	// 返回compiler
	return compiler;
};
2
3
4
5
6
7
8
9
10
11
12
13
14
15
16
17
18
19
20
21
22
23
24
25
26
27
28
29
30
31
32
33
34
35
36
37
38
39
compiler.run(callback)执行后,就会根据生命周期,执行对应的事件钩子函数
# 第二步,触发 WebpackOptionsApply 中间件
在 compilation 阶段会记录好依赖的工厂类。
在 make 阶段的时候会创建一个 SingleEntryPlugin 实例。
调用 compilation.addEntry 方法。
addEntry 会调用 _addModuleChain 方法,最终经过几次调用后会进入到 NormalModule.js 中的 build 方法。
class WebpackOptionsApply extends OptionsApply {
    process(options, compiler) {
         ...
        if (typeof options.target === "string") {
            let JsonpTemplatePlugin;
            let FetchCompileWasmTemplatePlugin;
            let ReadFileCompileWasmTemplatePlugin;
            let NodeSourcePlugin;
            let NodeTargetPlugin;
            let NodeTemplatePlugin;

            switch (options.target) {
                case "web":
                    ...
                    break;
                case "webworker":
                    {
                    ....
                        break;
                    }
                case "node":
                case "async-node":
                  ...
                    break;
                case "node-webkit":
                ...
                    break;
                case "electron-main":

                    break;
                case "electron-renderer":
                case "electron-preload":

                    break;

            }
        }
        ...
        new EntryOptionPlugin().apply(compiler);
        ...
    }
}

module.exports = WebpackOptionsApply;
2
3
4
5
6
7
8
9
10
11
12
13
14
15
16
17
18
19
20
21
22
23
24
25
26
27
28
29
30
31
32
33
34
35
36
37
38
39
40
41
42
43
44
上述代码 new EntryOptionPlugin().apply(compiler) 的时候会创建一个 SingleEntryPlugin 实例。
// WebpackOptionsApply -> EntryOptionPlugin ->SingleEntryPlugin
class SingleEntryPlugin {
  apply(compiler) {
    compiler.hooks.compilation.tap(
      'SingleEntryPlugin',
      (compilation, { normalModuleFactory }) => {
        compilation.dependencyFactories.set(
          SingleEntryDependency,
          normalModuleFactory
        );
      }
    );
    compiler.hooks.make.tapAsync(
      'SingleEntryPlugin',
      (compilation, callback) => {
        const { entry, name, context } = this;
        const dep = SingleEntryPlugin.createDependency(entry, name);
        compilation.addEntry(context, dep, name, callback);
      }
    );
  }
  static createDependency(entry, name) {
    const dep = new SingleEntryDependency(entry);
    dep.loc = { name };
    return dep;
  }
}
2
3
4
5
6
7
8
9
10
11
12
13
14
15
16
17
18
19
20
21
22
23
24
25
26
27
调用 compilation.addEntry 方法。
addEntry 会调用 _addModuleChain 方法,最终经过几次调用后会进入到 NormalModule.js 中的 build 方法。
# 第三步,调用 NormalModule 中的 build 方法
build 方法会先执行 doBuild,将原始代码经过 loader 进行转义。
经过 doBuild 之后,我们的任何模块都被转成了标准的 JS 模块,那么下面我们就可以编译 JS 了
doBuild(options, compilation, resolver, fs, callback) {
  const loaderContext = this.createLoaderContext(
    resolver,
    options,
    compilation,
    fs
  );
  // 执行loaders
  runLoaders(
    {
        resource: this.resource,
        loaders: this.loaders,
        context: loaderContext,
        readResource: fs.readFile.bind(fs)
    },
    (err, result) => {
      if (result) {
          this.buildInfo.cacheable = result.cacheable;
          this.buildInfo.fileDependencies = new Set(result.fileDependencies);
          this.buildInfo.contextDependencies = new Set(
              result.contextDependencies
          );
      }
      // result 是一个数组,数组的第一项就是编译后的代码
      const resourceBuffer = result.resourceBuffer;
      const source = result.result[0];
      const sourceMap = result.result.length >= 1 ? result.result[1] : null;
      const extraInfo = result.result.length >= 2 ? result.result[2] : null;
      // this._source 是一个 对象,有name和value两个字段,name就是我们的文件路径,value就是 编译后的JS代码
      this._source = this.createSource(
          this.binary ? asBuffer(source) : asString(source),
          resourceBuffer,
          sourceMap
      );
      return callback();
    }
  );
}
2
3
4
5
6
7
8
9
10
11
12
13
14
15
16
17
18
19
20
21
22
23
24
25
26
27
28
29
30
31
32
33
34
35
36
37
38
# 第四步,调用 parser.parse 方法,将代码转换成 ast。 使用 Parser 分析项目依赖
build(options, compilation, resolver, fs, callback) {
  return this.doBuild(options, compilation, resolver, fs, err => {
    // 编译成ast
    const result = this.parser.parse(
      this._ast || this._source.source(),
      {
          current: this,
          module: this,
          compilation: compilation,
          options: options
      },
      (err, result) => {
          if (err) {
              handleParseError(err);
          } else {
              handleParseResult(result);
          }
      }
    );
  });
}

static parse(code, options) {
  let ast;
  let error;
  let threw = false;
  try {
      // 编译成ast
      ast = acorn.parse(code, parserOptions);
  } catch (e) {
      error = e;
      threw = true;
  }
  return ast;
}
2
3
4
5
6
7
8
9
10
11
12
13
14
15
16
17
18
19
20
21
22
23
24
25
26
27
28
29
30
31
32
33
34
35
# 第五步,解析完 ast 后,就会对每个模块所依赖的对象进行收集
如果我们有 import a from 'a.js' 这样的语句,那么经过 babel-loader 之后会变成 var a = require('./a.js') ,而对这一句的处理就在 walkStatements 中,这里经过了几次跳转,最终会发现进入了 walkVariableDeclarators 方法,这里我们这是声明了一个 a 变量。这个方法的主要内容如下:
// import a from 'a.js'
walkVariableDeclaration(statement) {
  for (const declarator of statement.declarations) {
    switch (declarator.type) {
      case "VariableDeclarator": {
        // 这里就是我们的变量名 a
        this.walkPattern(declarator.id);
        // 这里就是我们的表达式 `require('./a.js')`
        if (declarator.init) this.walkExpression(declarator.init);
        break;
      }
    }
  }
}
2
3
4
5
6
7
8
9
10
11
12
13
14
这里的 require('./a.js') 是一个函数调用,在这里就会创建一个依赖,记录下对 a.js 模块的依赖关系,最终这些依赖会被放到 module.dependencies 中
# 在收集完所有依赖之后,会调用 compilation.seal 方法。 使用 Template 生成结果代码
遍历所有的 chunk 和 chunk 所依赖的文件。
将这些文件通过调用 MainTemplate 中的 render 生成最终代码。
// 将结果包裹到一个IIFE中
renderBootstrap(hash, chunk, moduleTemplate, dependencyTemplates) {
  const buf = [];
  buf.push(
    this.hooks.bootstrap.call(
      "",
      chunk,
      hash,
      moduleTemplate,
      dependencyTemplates
    )
  );
  buf.push(this.hooks.localVars.call("", chunk, hash));
  buf.push("");
  buf.push("// The require function");
  buf.push(`function ${this.requireFn}(moduleId) {`);
  buf.push(Template.indent(this.hooks.require.call("", chunk, hash)));
  buf.push("}");
  buf.push("");
  buf.push(
    Template.asString(this.hooks.requireExtensions.call("", chunk, hash))
  );
  buf.push("");
  buf.push(Template.asString(this.hooks.beforeStartup.call("", chunk, hash)));
  buf.push(Template.asString(this.hooks.startup.call("", chunk, hash)));
  return buf;
}
2
3
4
5
6
7
8
9
10
11
12
13
14
15
16
17
18
19
20
21
22
23
24
25
26
27
# webpack 整体流程分析总结
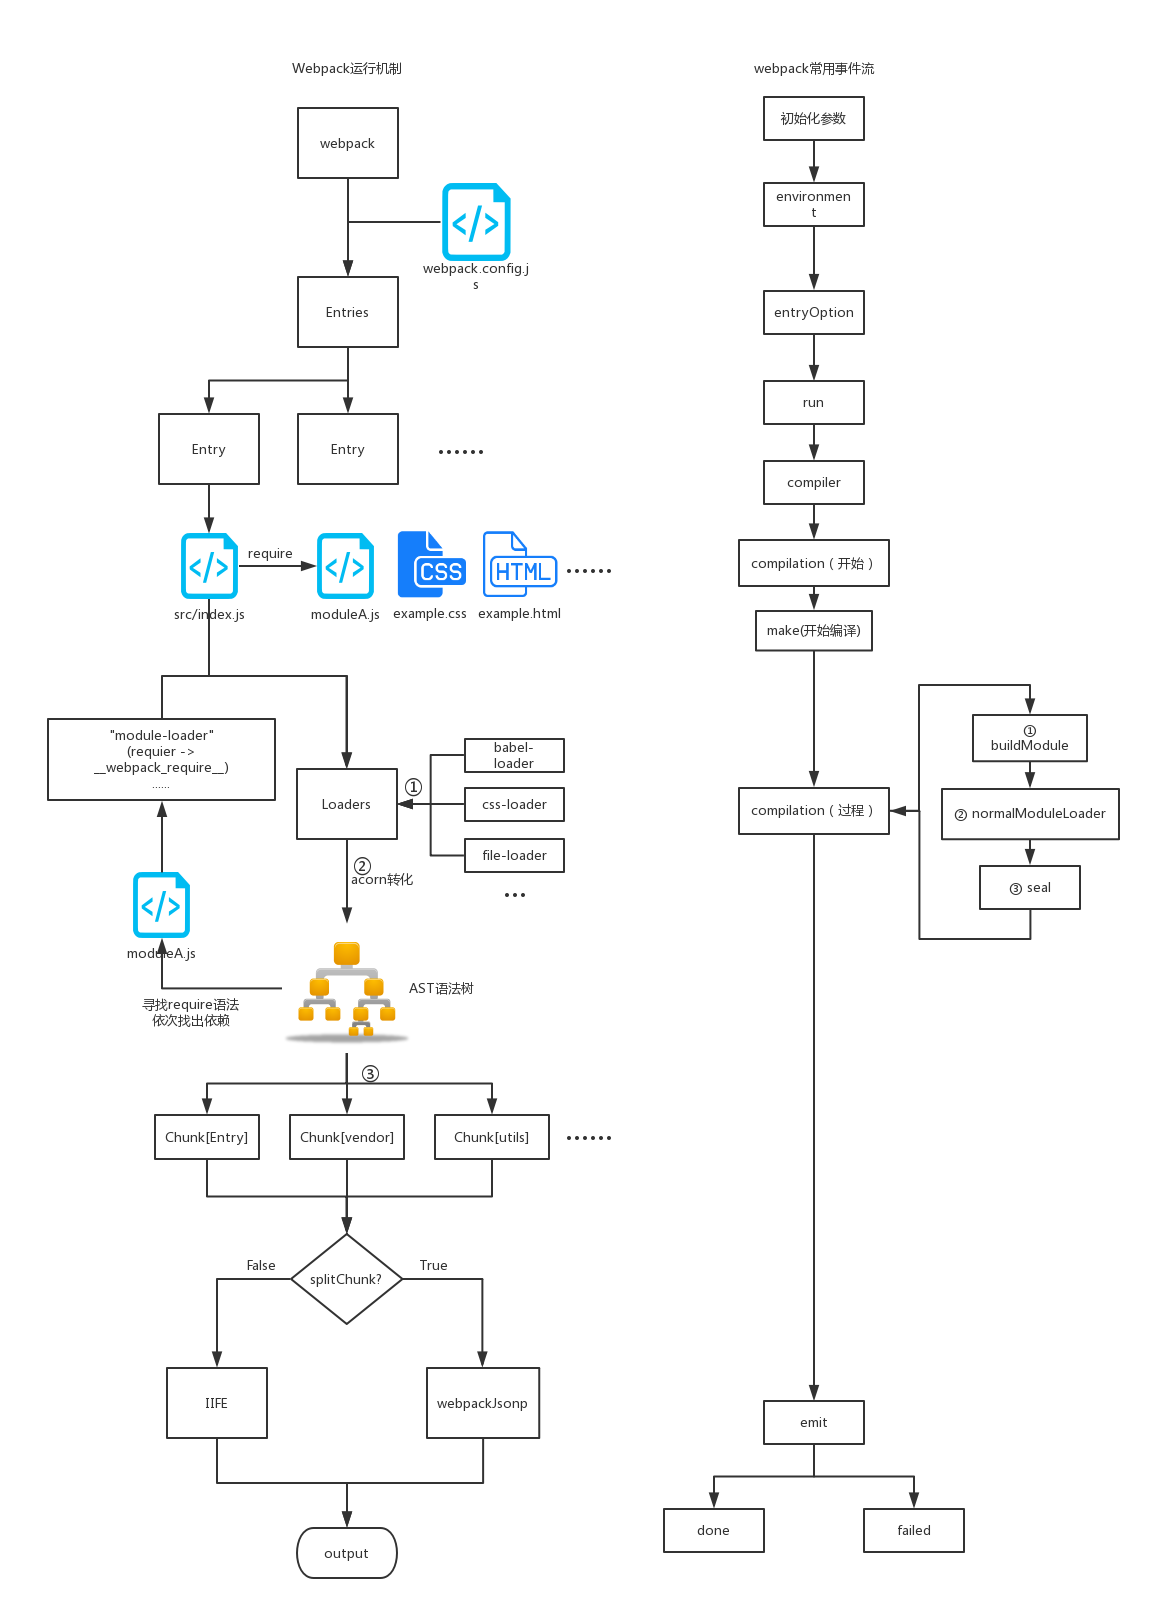
# 流程概括
1.初始化参数(得到参数):
从配置文件(webpack.config.js)中与 shell 语句中读取与合并参数,得出最终的参数。
2.开始编译:
用上一步中的得到的参数初始化 Compiler 对象,加载所有配置插件,通过执行对象的 run 方法开始执行编译 。
new Compiler(初始化得到的最终参数);

//通过apply 加载所有配置插件
for (const plugin of options.plugins) {
			// 执行自定义插件
				if (typeof plugin === "function") {
					plugin.call(compiler, compiler);
				} else {

					plugin.apply(compiler);
				}
			}

//执行对象的run 方法开始执行编译
compiler.run(callback);
2
3
4
5
6
7
8
9
10
11
12
13
14
15
3.确定入口:
根据配置中的 entry 找出所有入口文件 。
WebpackOptionsApply -> EntryOptionPlugin ->SingleEntryPlugin
4.编译模块: 从入口文件出发,开始 compilation 过程,调用所有配置的 Loader 对模块进行翻译,再将编译好的文件内容解析成 AST 静态语法树,再找出该 模块依赖的模块,再递归本步骤直到所有入口依赖的文件都经过了本步骤的处理 。
5.完成模块编译
经过第 4 步使用 Loader 翻译完所有模块后,生成 AST 语法树,在 AST 语法树中可以分析到模块之间的依赖关系,对应做出优化。
6.输出资源
将所有模块中的 require 语法替换成webpack_require来模拟模块化操作。
7.最后把所有的模块打包进一个自执行函数(IIFE)中。
# 流程图
这张图画的很好,把 webpack 的流程画的很细致。
# 编写插件
# 一个最基础的 Plugin 的代码是这样的
class basePlugin {
    constructor(options){
        //用户自定义配置
        this.options = options
        console.log(this.options)
    }
    apply(compiler) {
        console.log("This is my first plugin.")
    }
}

module.exports = basePlugin


const BasicPlugin =require (’./BasicPlug工n. j s ’);
module.export = {

    plugins:[
     new. BasicPlugin();
    ]
2
3
4
5
6
7
8
9
10
11
12
13
14
15
16
17
18
19
20
21
Webpack 启动后
1.在读取配置的过程中会先执行 new BasicPlugin(options ),初始化一个 BasicPlugin 并获得其实例。 2.在初始化 compiler 对象后,
3.再调用 basicPlugin.apply (compiler)为插件实例传入 compiler 对象。
4.插件实例在获取到 compiler 对象后, 就可以通过 compiler.plugin (事件名称,回调函数)监听到 Webpack 广播的事件, 并且可以通过 compiler 对象去操作 Webpack.
这就是最简单的 Plugin😊, 但在实际开发中还 有很多细节需要注意 ,下面进行详细介绍。
# 到底 Compiler 和 Compilation 是什么
开发 Plugin 时最常用的两个对象就是 Compiler 和 Compilation,它们是 Plugin 和 Webpack 之间的桥梁。 Compiler 和 Compilation 的含义如下。
Compiler 对象包含了 Webpack 环境的所有配置信息,包含 options、loaders、plugins 等信息。这个对象在 Webpack 启动时被实例化,它是全局唯一的,可以简单地将 它理解为 Webpack 实例。
Compiler-----》 Webpack 实例
Compilation 对象包含了当前的模块资源、编译生成资源、变化的文件等。当 Webpack 以开发模式运行时,每当检测到一个文件发生变化,便有一次新的 Compilation 被 创建 。 Compilation 对象也提供了很多事件回调供插件进行扩展。通过 Compilation 也能读取到 Compiler 对象。
Compiler 和 Compilation 的区别在于: Compiler 代表了整个 Webpack 从启动到关闭的生命周期,而 Compilation 只代表一次新的编译。
# 温习一下 webpack 事件流
webpack 就像是我们工厂中流水线,要经过一系列的流程才会把我们的源码转化成输出结果 。在这条流水线当中每个处理流程的职责都是单一的,多个流程之间存在依赖关系,只有在完成当前处理后才能提交给下一个流程去处理。插件就像插入生产线中的某个功能,在特定的时机对生产线上的资源进行处理。
Webpack 通过 Tapable (https://github.com/webpack/tapable) (opens new window)来组织这条复杂的流水线。 Webpack 在运行的过程中会广播事件,插件只需要监听它所关心的事件,就能加入这条生产线中,去改变流水线的运作。 Webpack 的事件流机制保证了插件的有序性,使得整个系统的扩展性良好。
Webpack 的事件流机制应用了观察者模式,和 Node 扣中的 EventEmitter 非常相似 。Compiler 和 Compilation 都继承自 Tapable,可以直接在 Compiler 和 Compilation 对象上广播和监昕事 件,方法如下:
/**
*广播事件
食 event-name 为事件名称,注意不要和现有的事件重名 * params 为附带的参数
*/
compiler.apply ’event-name’, params);
/**
*监昕名称为 event-name 的事件,当 event-name 事件发生时,函数就会被执行 。 *同时函数中的 params 参数为广播事件时附带的参数 。
*/
compiler.plugin (’event-name’, function (params) {

} ) ,
2
3
4
5
6
7
8
9
10
11
class SyncHook{
    constructor(){
        this.hooks = {}
    }

    // 订阅事件
    tap(name, fn){

        this.hooks[name] = [fn]
    }

    // 发布
    call(){
        this.hooks[name].forEach(fn=>fn())
    }
}
2
3
4
5
6
7
8
9
10
11
12
13
14
15
16
# 实战剖析
来看一看已经被众人玩坏的 html-webpack-plugin
const pluginName = 'ConsoleLogOnBuildWebpackPlugin';


let assetsHelp = (data) => {
    let js = [];
    let css = [];
    let dir = {
        js: item => `<script src="${item}" class="lazyload-js" type="module"></script>`,
        css: item => `<link rel="stylesheet" href="${item}">`
    }
    for (let jsitem of data.js) {
        js.push(dir.js(jsitem))
    }
    for (let cssitem of data.css) {
        css.push(dir.js(cssitem))
    }
    return {
        js,
        css
    }
}


class ConsoleLogOnBuildWebpackPlugin {
    apply(compiler) {
        compiler.hooks.compilation.tap(pluginName, compilation => {

            compilation.hooks.htmlWebpackPluginAfterHtmlProcessing.tap(pluginName, (webpackPluginData) => {
                console.log('🍎🍎🍎🍎🍎', webpackPluginData.assets)
                let _html = webpackPluginData.html;
                let result = assetsHelp(webpackPluginData.assets)
                _html = _html.replace(/@components/g, '../../../components');
                _html = _html.replace('<!--injectjs-->', result.js.join(''));
                _html = _html.replace('<!--injectcss-->', result.css.join(''));
                webpackPluginData.html = _html;
            })
        });

    }
}
module.exports = ConsoleLogOnBuildWebpackPlugin;
2
3
4
5
6
7
8
9
10
11
12
13
14
15
16
17
18
19
20
21
22
23
24
25
26
27
28
29
30
31
32
33
34
35
36
37
38
39
40
41